
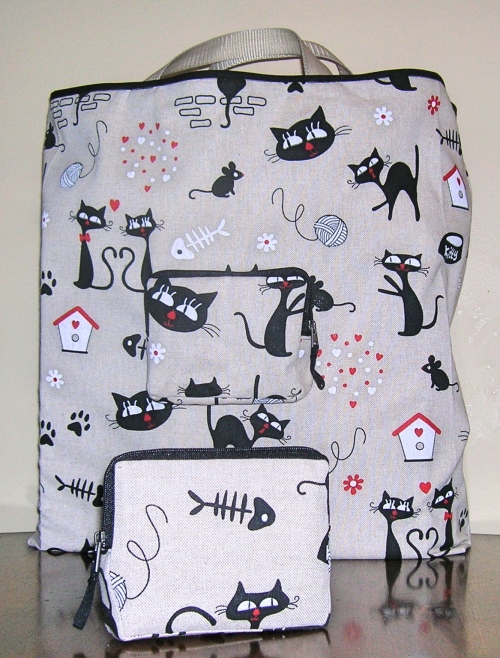
A functional yet basic convertible bag design. A book bag, a market carry-all, the perfect everyday tote. Carry by hand when in use; then fold it into its zippered pouch and slip it in your coat pocket so that it is at the ready.
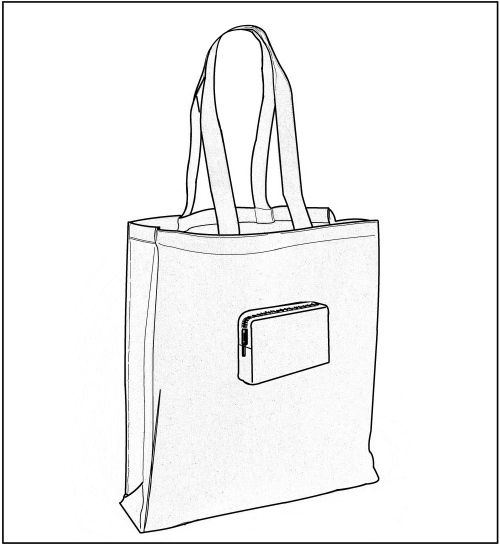
Dimensions: 18″ high / 16″ wide / 4″ deep, with an exterior zippered pouch pocket and nylon handles. [45.75 cm x 40.5 cm x 10 cm]
Construction Method: Turned finish – this method may be recognized by noting the lack of machine-stitching that is visible at points of assembly on the exterior side of the bag. This is possible by placing the material, or parts, face to face, machining and turning right-side out. It is the most commonly used assembly process.
Material Used: 100% nylon ripstop, 60″ wide
You will need:
- 1.25 yds. [1.15 m] water-proof nylon ripstop, 60″ wide [152 cm]**
- 2/3 yds. [61 cm] nylon webbing, 1″ wide [25mm] *
- 1 reversible zipper, 10″ long [25.5 cm]
- 1.25 yds. [1.15 m] double-fold bias tape, 1/4″ wide [6 mm] (optional)
- 1 spool polyester thread
** NOTE: If your fabric choice has a directional printed design like mine, you will need to cut the body section in half. With wide goods, you’ll only need half the required yardage as the front and back sections can be cut side by side across the fabric’s width. No allowance made for matching the print.
* NOTE: Bag handles can be made as shoulder straps by increasing the yardage of webbing, as shown below in diagram.
PATTERN
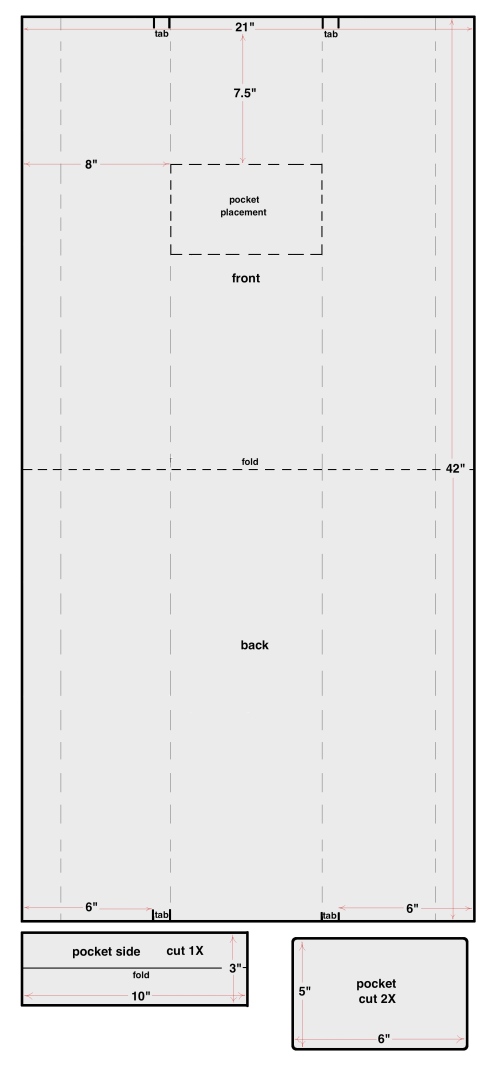
The pattern itself is based upon a simple flat grid, which fits into a long rectangle, of which the size depends on the desired depth of the style (in this example, 4″). So the overall bag dimensions are 18” high (length) by 16” wide (width) by 4” deep (depth). This will give a roomy bag cavity volume of 1,152 cubic inches which should carry a reasonable amount of items and weight.
The exterior pouch is a zippered pocket that can be used to carry keys, wallet, etc. When not in use, the totebag can be folded into the pouch for storage.
Seam allowance (1/2″) or [12 mm] is included in this pattern-draft.
CUTTING
- cut 1X body (see note above)
- cut 2X pocket
- cut 1X pocket side
- cut 2 bag handles from webbing, 12″ long [30 cm] (see note above)
CONSTRUCTION
Make the pocket pouch. With right sides together (RST), fold the POCKET SIDE piece in half lengthwise, and wrap around the end of the reversible zipper. Stitch across the short end. Repeat this step with opposite end of zipper.
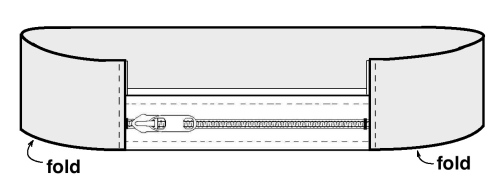
Turn fabric right-side-out and press seams flat. Top-stitch across ends of zipper.
Align the “open” side of the POCKET SIDE to the edge of one of the POCKET pieces. The seaming of the zipper should be in the middle of the shorter sides of the rectangle. Pin/baste the POCKET SIDE to the POCKET piece. There is no seam allowance value on the zipper tape itself so stitch along the edge of the zipper tape when joining the two sections. Sew around the perimeter of the POCKET SIDE and clip seam allowance in the corners if the fabric does not lie flat. Grade the excess material in the seam allowance.
Place remaining POCKET piece on top of the pouch assembly, with RST and match in the corners. Flip the whole assembly over so that the previous line of stitching is visible. Pin/baste perimeter of rectangles together. Beginning slightly inside the lower corner, stitch following previous stitches, around the lower corner, up the side, across the top, down the side, and around the last corner, leaving an opening to turn out the fabric. Trim diagonally at each corner to reduce any bulk. Turn pocket out through the opening and slip-stitch opening close. Set aside.
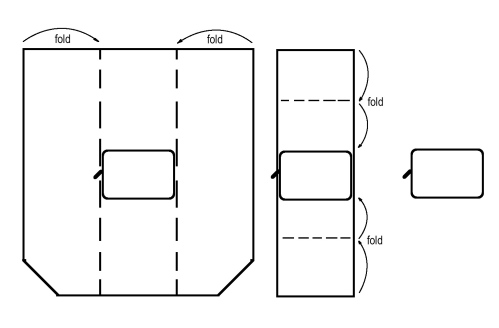
Apply pouch to body. Position pocket with zipper facing toward top edge of bag. Place it in the center of the front bag section, 7.5″ [19 cm] from the top edge and 8″[20 cm] from either side seam. Pin/baste in place. Sew along the edge of the folded fabric and zipper tape to install.
Finish bag opening. If using, open bias tape flat and sew onto top edges of bag. Wrap raw edges with the bias tape and bind. Otherwise, sew a narrow 1/4-inch double-rolled hem to complete the bag opening.
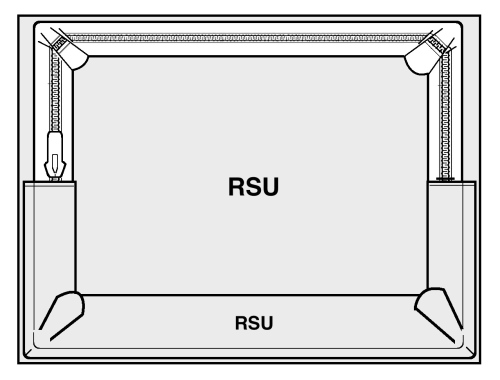
Add bag handles. Position each webbing strip, 6″ [15 cm] from each corner of the bag, on the inside of the bag (wrong side of fabric) to form a loop for the bag handle on each section and X-stitch in place to secure.
Complete totebag. Fold the fabric with WST, and match at corners. Sew French seams on both sides of the bag, by stitching a 1/4-inch seam allowance, then trimming seam allowance close to stitching. Turn bag inside-out and sew another 1/4-inch seam allowance along sideseams; press seams flat.
Note: If using a directional printed fabric as in this tutorial, cut the body section in two and add a 1/2-inch seam allowance. Sew a French seam along the bottom edge of the bag before closing the sides. 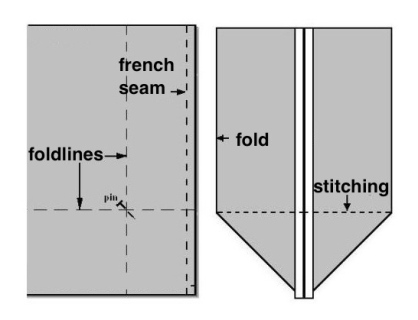
Miter the gusset end by marking with a pin where the gusset end fold will come on front and back panels, (in this case, it is 2″ in and 2″ up from edges). Fold in the side turn at the pins, where the gusset fold will come; and, fold in the corner triangle to the pins. Press along the folds. Stitch across side seam from pin to pin to create each gusset for the totebag.
The tote bag when flattened, folds vertically into thirds towards the centre, then the layers fold horizontally two times from the bottom and two times from the top, both resting on top of the pocket pouch, which is itself reversible and wraps around the stacked layers. To contain the tote bag, the pocket zips closed. The smaller unit can now fit easily into a coat pocket or purse, ready to be used when needed.


Thank you Mister Don
Provenance : Courrier pour Windows 10
Hello Don, What an awesome looking bag! Simple but very useful! Question: I’d like to make this from leather/suede. Do you think I will struggle with using this pattern with leather or suede in a garment weight? Likely 2-3oz? 1.0 -2.0mm thickness?
Thank you in advance for your time and consideration! Also for all that you give of yourself and sharing your knowledge selflessly!
Best regards
Judith Watson jjwchroma@aol.com
Thank you Jenine. Your material choice would be too thick to fold up into its own pocket. However the shape and construction of the design could be made in a supple, one-ounce lambskin without the pocket option. You would need to modify your sewing machine.
Thank you very much!
Smart! Can’t wait to make this. I have the perfect fabric for it. Thank you.
Very useful pattern. Thank you for sharing.
This is simple design but i love it .So how to find quality handbags in Denver area ?
Most American retailers stock from reputable manufacturers, both domestically and aboard. Find your favourite bag designer and ask who retails their products.