
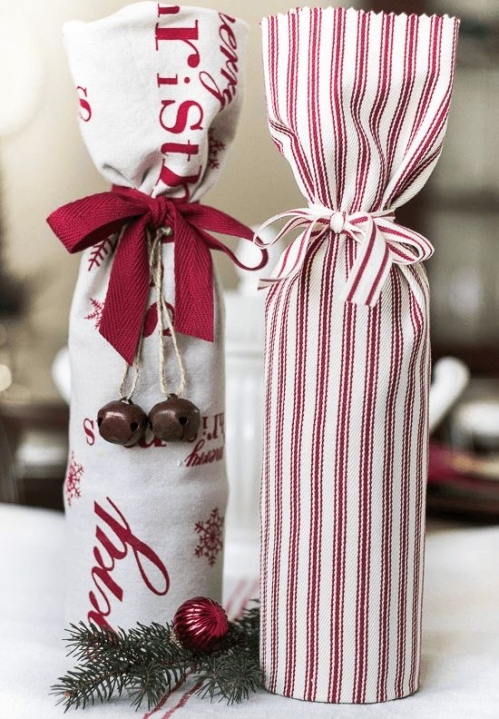
Something a little different from the design studio today. Instead of talking about designing our own fashion bags I have a quick and easy tutorial about creating your own holiday gift bags. My sister and I used striped ticking and stencilled some crashcloth from her quilting classes to make our gift bags this past weekend but you can use almost anything fabric you want. Think holly jolly and ’tis the season. It was only an after-thought that I think we should have lined them as well. Live and learn, I say!
My sister and I were reminiscing about how Mom would have all us kids on holiday wreath duty at this time of year when we lived on the homestead. I suppose it was her way to keep idle little hands busy and curb our enthusiasm that Santa was coming soon. There was four of us… me, my two sisters, and my baby brother who was really too young to be of any help except eating popcorn Mom made from scratch. Throughout the year, Mom collected clear dry-cleaning plastic bags and clear produce plastic bags from the grocer to be turned in feathery, shimmering holiday wreaths trimmed with pinecones and dried flowers we picked on our woodland excursions and freshly-pressed old ribbons from gifts received throughout the year. My job, being the eldest, was to cut away any printed labels from the plastic bags, then cut open the bags into a flat plastic sheets. Each flat sheet was then divided into approximately 12-inch strips. Mom, second in the assembly line, would roll the plastic sheets into a tight ‘cigar’ roll and slice 1-inch ribbons from it to create piles of feathery streamers. My sisters, whenever they weren’t grabbing handfuls of popcorn and next in the assembly chain, would tie the plastic streamers one-by-one around recycled wire clothes hangers that Mom had distorted into circular shapes. Once all the cutting had been completed, we all joined in with the popcorn-eating and double-knotting of the shimmering streamers to the wreath, packing them tightly together next to each other until you could no longer distinguish the coat hanger. I recall we were a productive team of Santa’s little helpers and made wreaths for every window and door frame in our home.
Mom would trim up the scraggly bits from the wreaths to even-out the form into a fluffy feathery halo and tie on big ribbon bows and clusters of pinecones.
So today I thought I’d show you how to making your own lined holiday gift bags which are quick and easy to make assembly-line-style with your children. I think children can be very creative and it is easy to harness their enthusiasm for the holidays. Most of all, it creates wonderful memories and holiday traditions.
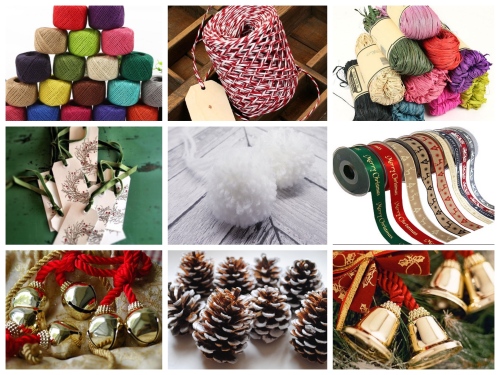
You’ll need a few supplies but as sewers and crafters you may have most of what you need covered already and it is an excellent way to tidy up your sewing room and re-purpose those odds and ends you’ve been saving or use up from your fabric stash or quilter’s fat quarters. The list is short: cotton prints for exteriors, cotton stripes and solids for interiors; colourful cloth ribbons, flat braids, cording, and twines for tying up; and handmade hang-tags from Christmas Past and ornamental finishing touches such as jolly jiggle bells, yarn snowballs (pompoms) or dried natural pinecones. Actually, anything that you have on hand!
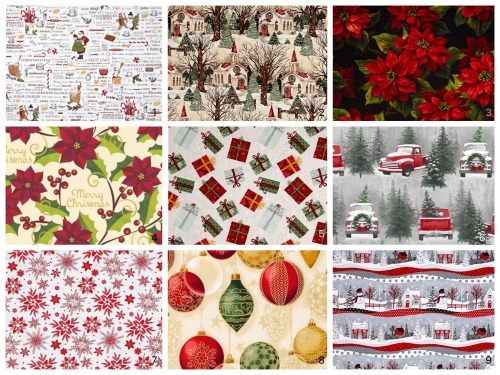
1. From Robert Kaufman, ¨Holly Jolly¨, designer: Mary Lake-Thompson; 2. ¨Winter Church Scenic¨ by Spring Creative Products, designer: Susan Winget; 3. From Pillow & Maxfield, ¨Scarlett Poinsetta¨, designer: Michael Miller; 4. From Wilmington Prints, ¨Woodland Holiday¨, designer Lisa Audit; 5. Wilmington’s ¨Frosted Holiday Presents¨, designer: Katie Doucette; 6. From Henry Glass & Co., ¨Holiday Tradition¨, designer: Jan Shade Beach; 7. From Henry Glass & Co., ¨Holiday Homecoming Snowflake¨, designer: Jan Shade Beach; 8. From Robert Kaufman, ¨Winter Grandeur¨, designer: RK Studio; 9. ¨Holiday Homecoming Novelty Stripe¨, from Henry Glass & Co., designer: Jan Shade Beach.
Every year fabric designers come out with their holiday collection prints which are colourful and festive to take much of the guesswork out of creating a theme. This year is no exception. Above are a few examples of holiday themed prints which by no means is complete. You can get about four gift bags from 1 meter of 115 cm wide cotton fabric. For the linings I prefer using stripes and solids but take a look at this year’s offerings from various fabric designers’ collections below, the patterns are wonderful.
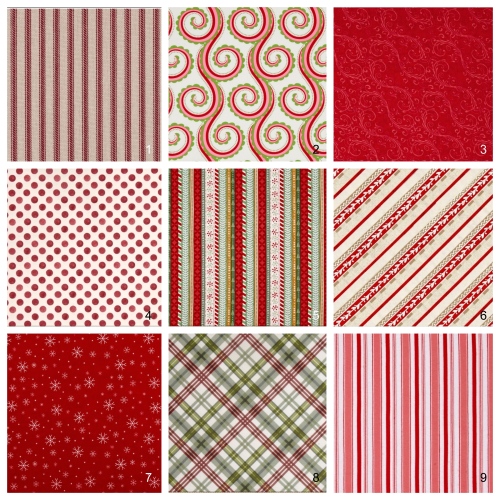
1. From Magnolia Home Fashions, ¨Red Ticking¨; 2. From Pillow & Maxfield, ¨Curly Swirl Santa Red¨, designer: Michael Miller; 3. From Henry Glass & Co. ¨Holiday Homecoming Swirl Red¨, designer: Jan Shade Beach; 4. ‘Romantic Afternoon Flannel Dots¨by Wilmington Prints, designer: Lisa Audit; 5. ¨Frosted Holiday Ticking^from Wilmington Prints, designer: Katie Doucette; 6. ¨Gingerbread Christmas Diagonal Stripe¨by Maywood Studios, designer: Meg Hawkey; 7. from Riley Blake Designs, ¨Jingle Jangle Snowflake¨, designer: Christopher Thompson; 8. From Wilmington Prints, ¨Romantic Afternoon Flannel Plaid¨, designer: Lisa Audit; and 9. ¨Cosy Christmas Flannel Stripe¨by Riley Blake Designs, designer: Lori Holt.
This particular bag design is large enough for gift-wrapping a bottle of wine, a tall stack of home-baked cookies, an assortment of mixed unshelled nuts, candy boxes, or a small toy. Once you have learned the sequence of assembly, you can use this production method to make larger gift-bags using larger quantities of fabric.
Before we get started, a word about safety and ability. While I consider sewing to be a safe activity to do, it is not without risk. We are using sharp objects like scissors and dress pins, power tools like a sewing machine, and hot equipment like steam irons. It is important to respect and use these tools correctly. Assign each job to someone who understands how the equipment operates and has the ability to perform each one. The sewing skill required is basic. This project requires no pattern and only uses a straight stitch in its construction. Even a school child can sew a straight stitch on a sewing machine. Pressing with a steam iron, on the other hand, should be left to a teenager or an adult. Let tiny tots be in charge of ribbons and trimmings. They are very good at making hangtags from old greeting cards using blunt scissors and gum paste.
Ok, let’s get started…
BASIC SET-UP
Step 1: For each meter of fabric, fold the printed material across its width and align selvedge with selvedge and pin selvedges together. Press the fold of the material flat using a steam iron. Open the fabric face up and lay flat. Cut along the fold line to form 2 portions.
With each portion (100 cm cm x 55 cm), fold the material in half along its length and align the raw top and bottom edges . Pin together and iron the fold of the material flat. Re-open the fabric face up and lay flat. Cut along the fold line to form another 2 portions. In total, there are 4 fabric portions. If the print is a directional pattern, be certain to position the fabric so that the print is pointing in the correct direction (usually it is upward).
Repeat the above steps for the interior fabric. Cut 4 portions.
Step 2: Join 1 exterior fabric with 1 interior fabric. (In this case, 1 print fabric with 1 solid or striped fabric).
Place the exterior fabric face up with the pattern of the print in the correct direction and lay flat.
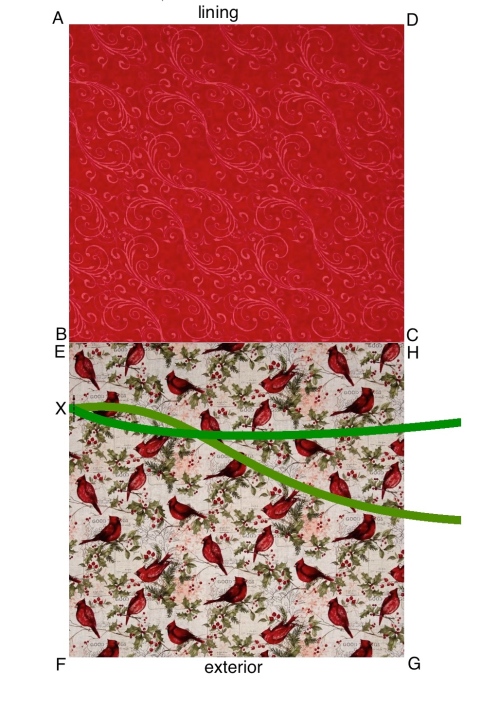
Then lay the interior fabric face down on top of the exterior fabric and pin together along top edge, matching B to E and C to H.
Step 3: Machine-stitch a straight seam across the top of the fabric bundle using a 10mm seam allowance from B-E to C-H.
Step 4: Press seam allowance open and flat with steam iron. Then press all the seam allowance to one side from the exterior portion to the interior portion (E-H towards B-C).
Step 5: Place the fabric rectangle face up with the exterior portion at the bottom and lay flat.
Measure down from the seam line on the left side 5 cm (from B-E to point X) and apply an evenly-folded piece of ribbon or twine ( 1 meter long) at point X. Baste or pin in place.
Fold the fabric rectangle in half across its width matching points A to D, B-E to C-H, and F to G.
Keep ribbon ends loose within the fold.
Step 6: Machine-stitch a straight seam from top to bottom (A-D to F-G) using a 10mm seam allowance to form a tube. Be certain to catch the sandwiched ribbon in the seam stitching. Press seam allowance open and flat.
Step 7: Machine-stitch a straight seam across the bottom of the fabric tube using a 10mm seam allowance from F-G to fold of the fabric. Do not sew over the ribbon ties. Press seam allowance open and flat.
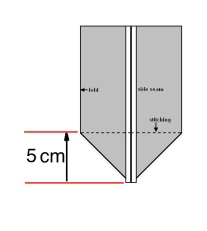 Step 8: Align the vertical seam over the horizontal seam at point F-G to create a diagonal point.
Measure from point end inward along seam line 5 cm and sew perpendicular to the seam lines.
Repeat this step, this time aligning horizontal seam F-G over the foldline and sewing a perpendicular seam 5 cm from the corner point.
Step 9: At the top of the tube, turn under the raw edge 10 mm and press flat. Repeat step 8 at A-D and also at the fold line, leaving the top of the tube open for turning.
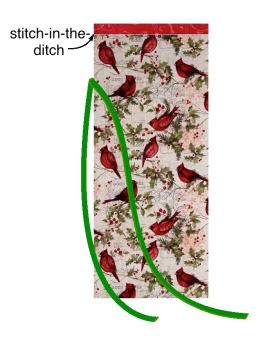 Step 10: Pull the bag right-side-out through the opening in the lining and match the turned edges of the opening together. Edge-stitch along opening to close up. Then drop the lining into the cavity of the gift bag and stop when the lining reaches the seam allowance of the joining seam (B-C to E-H). Here you want to ¨wrap¨ the lining over the seam allowance to form a piped effect across the top of the gift bag. The width of this effect is equal to the seam allowance, 10 mm wide. Stitch-in-the-ditch along the groove of the seam line to catch the lining in place.
Your teamwork is complete. Add a hangtag and any ornaments to the ribbon ties.


Thx for giving so much knowledge