In the fashion industry, handbag manufacturers cut and make their own zippers to length. There are a number of reasons why you would want to make your own zipper using continuous zipper chain.
- While handbag and luggage zippers are available at your sewing notion retailer, the supply is limited and may not be to the length that you may require for your prototype. By making your own, you can customize the length and style of the zipper you want ie: one way non-separating, two-way non-separating or one-end-closed. [NOTE: The only style of zipper you cannot make with continuous chain is a one-way or a two-way separating zipper, such as a jacket style zipper].
- When you make your own zipper you can select the style of zipper slider you desire: non-locking, locking, key locking or double reversible.
- Often times it is more economical to make your own. To determine how much to cut for a custom zipper, add 2″ [5 cm] to the desired length you want the final zipper length to be (1″ [2.5 cm] extra for each end) of continuous zipper chain.
ZIPPER TERMINOLOGY
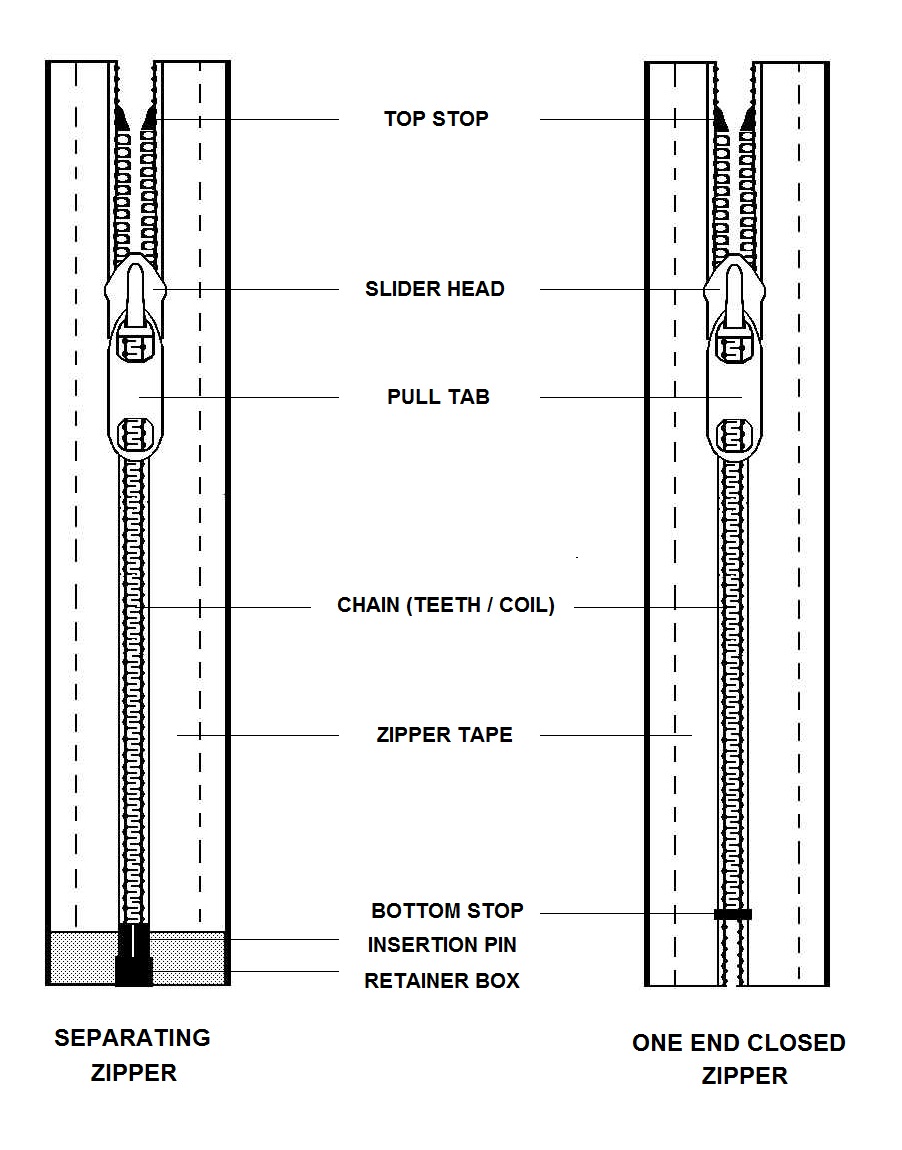 TOP STOP – Two permanent stays affixed to the top most end of a zipper, to prevent the slider from coming off the chain.
SLIDER HEAD – The device that moves up and down the chain to open or close the zipper.
PULL TAB – The part of the slider that is held to move the slider up or down.
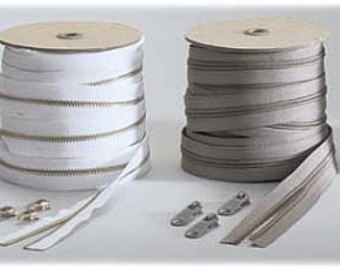
ZIPPER CHAIN (CONTINUOUS) – a length of zipper tape, either coil or tooth style, sold by the yard. Allows you to make and customize your own zippers. At least one end must be sewn closed. It cannot be used to make separating jacket zippers.
ZIPPER TAPE – The fabric part of the zipper.
BOTTOM STOP – A permanent stay similar to a large staple, used at the bottom end of a zipper to prevent each half of the zipper from separating.
INSERTION PIN – A device used on a separating (jacket type) zipper whose function is to allow the joining of the two zipper halves.
RETAINER BOX – A device used on a separating (jacket type) zipper whose function is to correctly align the pin.
ZIPPER SLIDER & PULL: the sliding head on the zipper. The actual pull is the articulated lever attached to the slider. [Note:the zipper sliders from one brand (ie: YKK brand) are usually not interchangeable with other zipper brands (ie: Riri brand zippers, etc.)]

- single slider-a zipper slider with only one pull
- double-reversible slider – a zipper slider with a pull tab on both sides of the slider. Uses: reversible totebags
- non-locking slider – a zipper slider which slides easily and has no internal locking mechanism to hold it inplace. Uses: purse pockets, handbags, luggage
- auto-locking slider – a zipper slider which has an internal locking mechanism to hold the slider in place. Uses: handbag openings
- key locking slider – a zipper slider which locks and unlocks with a removable key. Uses: security envelopes, portfolios, luggage
HAND BAG ZIPPER CONFRIGURATIONS
A. One-way Non-separating Bag Zipper

Uses: Purse Openings, Inset zip pockets
B. Two-way Non-separating Bag Zipper (head-to-head)

Uses: Totebags, Portfolios, Luggage
C. Reversible Non-separating Bag Zipper (flip pull tab)

Uses: Reversible Totes
WHAT IS THE DIFFERENCE BETWEEN TOOTH & COIL STYLE ZIPPERS?
For many bag projects it is your preference which style you choose:
TOOTH STYLE: have individual teeth in metal or plastic set on a cloth tape. Metal colour and finish are usually matched to bag fittings. Plastic zippers are ideal for marine and saltwater uses.
COIL STYLE: often called self-repairing, has a continuous spiral of nylon filament set on a cloth tape. It is more flexible and smoother running than toothed zippers. As a general rule, typically the #5 is for small evening bag styles and the #7 & #8 are used for handbags and luggage.
TOOTH/COIL SIZE: the smaller the number the smaller the gauge size of the chain: ie. #5 is smaller than #10 and thus not as strong.
SHOULD YOU USE TOP & BOTTOM STOPS?
The purpose of zipper stops is to keep the zipper sliders from derailing when the zipper is in use. In handbag construction, use of top and bottom stops can be optional. If the ends of the zipper chain are sewn into a seam, you may choose not to attach top/bottom stops because the seam will act as the “stops”. I often use what is known as a “wedge” instead of a stop.
 Another option is to attach a grip tab to each end of the zipper chain. It is often made from the fashion fabric used in the prototype. This finish will prevent the zipper slider from dislodging while the tab itself can be gripped in the hand when operating the zipper.
When using zipper stops, bottom stops are attached to one end of a one end closed zipper and both ends of a one or two-way non-separating zipper. Bag manufacturers tend to use the latter method. Top stops are used at the top end (the “open” end) of a one-end closed zipper and usually are not very practical in handbag design.
WHAT SIZE TOP & BOTTOM STOPS SHOULD YOU USE:
For #5 and #8 coil and #5 tooth zipper use #8 stops. For #10 coil and #10 tooth zipper use #10 stops.
HOW TO ATTACH A ZIPPER SLIDER ONTO ZIP CHAIN
1). Cut the zip chain to length plus 2” [5 cm].
2). On one end of the zipper chain (tape), part the zipper teeth about 2″ [5 cm].
 3).
3).  Insert one side of the zipper about 1/4 ” [6 mm] into the curved end of the zipper slider.
[NOTE: On double pull sliders place the slider so that the angled portion of the flange is up],
4). Insert the other end of the zipper into the slider. To prevent misalignment on the other end of the zipper line up the short ends of the zipper tape evenly.

5). Firmly holding both zipper halves slide the slider onto the zipper teeth. It may take several attempts to line up the zipper teeth and to prevent a bulge on one side of the zipper tape if the teeth are misaligned.
6). Apply stops to each end of the zipper. Trim away any excess at zipper ends with pinking shears to neaten.

[NOTE: When putting two zipper sliders on the same zipper tape, attach the second slider on the opposite end of the zipper tape using the same method as above so that the sliders are facing head-to-head].
ZIPPER FAILURE
Zipper failures are usually the result of the zipper slider wearing out, especially if no apparent damage is noticeable to the zipper teeth. For zippers where the teeth separate after the zipper is closed, a possible solution (though at times only a temporary one) is to pinch the slider from the top of the slider to the bottom of the slider with a pair of pliers to seat the slider closer to the zipper teeth (not too tight though). If this does not work, try replacing the slider before replacing the entire zipper.
Coil zipper are a bit more forgiving as they are often called “self-repairing” zippers. Should the coil break open, carefully pull the slider to the “open” position at the bottom of the zipper then re-zip the fastener to correct the problem. Otherwise, if there is a kink or break in the spiral filament, the whole zipper will need to be replaced.
ZIPPER WEDGES
The following construction method works well to clear the teeth in the path of the machine-stitching and eliminate the bulk when installing zippers in a seam.
 Cut the length of zipper needed for the project minus 2″ [5 cm] (ie. for a 25″ zipper cut a 23″ length of zipper. Install zipper slider(s).
- Cut 2 strips for wedges out of the project fabric (I often use the selvedge edge as it is waste), 2″ [5 cm] long by width of the zipper tape.
- On each end of zipper, pin each zipper wedge face side down to right side of zipper matching short raw edges.
- Using a zipper foot, stitch 1/2″ [12 mm] from raw edge.
- Fold zipper wedge out flat & top stitch 1/4″ [6 mm] from edge with zipper foot.
- Install into bag project and trim excess of wedge in seam allowance.

HOW TO SHORTEN A ZIPPER
At times if you are designing a single bag, it may be easier to purchase a ready-made zipper if it meets your design specifications. In such a case, purchase a separating zipper (aka jacket zip) which is longer in length than what you require for the prototype. For example, if the finished bag opening is 18” [46 cm] long, buy a separating zipper that is 20”+ [51 cm+] in length, plus 2 zipper stops.)
TOOTH STYLE ZIPPER:
1. Determine the final length you want the bag zipper to be. Measure this amount plus 2” [5 cm], from the stops at the top end of the separating zipper when the zipper is closed. Mark this length with chalk on the zipper tape. (see A)
2. Cut across the zipper tape at the chalk mark. Discard the bottom end of the zipper. (see B)
3. Attach the new zipper stop over the teeth channel on the face side of the zipper. Ensure the prongs of the zipper stop insert through the zipper tape completely. Bend the prongs flat against the back of the zipper teeth using pinch-nose pliers.
4. Pull apart the zipper teeth on the cut end up to the stop.
5. Using bull-nose pliers, carefully remove the excess teeth from the tape. (see C)
6. Neaten the zipper end by trimming it with pinking shears. Allow the same seam allowance from the stop as the amount at the top end of the zipper. This is usually 5/8 of an inch [15 mm].
7. You may add the second stop to the top end of the zipper to close both ends or use the existing original zipper stops. (optional – see D)
8. The zipper is ready to install in the bag.

COIL STYLE ZIPPER:
1. Determine the final length you want the bag zipper to be. Measure this amount from the stops at the top end of the separating zipper when the zipper is closed. Mark this length with chalk on the zipper tape.
2. Attach a new zipper stop over the zipper coil on the face side of the zipper. Ensure the prongs of the zipper stop insert through the zipper tape completely. Bend the prongs flat against the back of the coil using pinch-nose pliers.
3. Repeat step #2 at the open end of the zipper.
4. Once the stops are in place, measure from the end stop an amount equal to the top end of the zipper and mark its location on the tape with chalk. Cut through the coil and discard the retainer box end of the separating zipper.
5. Using a match or candle, sear the raw edges of the nylon coil to prevent raveling.
6. The zipper is now ready to install.