

Photo Credits: Nyla Noor
“look at it from all angles”
In my mail lately, I have been receiving select jpegs and requests for pattern-drafts based on that chosen item. Upon viewing each submission I often question, “Why am I being asked to draft such a basic bag design?” In my mind’s eye or is it my designer’s brain, I visualize a simple pattern shape. I have to ask, “Why aren’t you seeing it too?”
Now if I was being naughty, I’d suspect someone wanted me to do their design homework for them, yet in all truthfulness I’m guessing that those new to the world of fashion design haven’t developed their spatial skills.
Visualization or what is known as, spatial perception in fashion design includes images, symbols, scale diagrams, cutaway diagrams, cross-sections, production flow charts, specification worksheets, technical flats, 3-dimensional illustrations, and flat pattern-making techniques to develop a new product. Along with scheduling time lines, mood & story boards, and other graphic designs to communicate the idea or new concept, these mental skills are used by designers and manufacturers to bring new products to the marketplace. All require a high degree of visual literacy or visual/spatial abilities and skills.
As for the pattern-drafting, the design and formation of any fashion bag is based upon simple body shapes when laid flat, fit into a square or rectangle, of which the size depends on the final shape and parameters of the pattern. In other words, it’s a box.
Now visualize that box with handles for toting around. Don’t let the “bells and whistles” distract you from the basic shape. Look for the pattern grid(https://bagntell.wordpress.com/2010/01/05/pattern-grids-an-invisible-foundation/) by identifying the elements you plan to use throughout your design. Think out a rough shape, the approximate size of the square or rectangle in your mind. Every bag design has some kind of top finishing which often provides the focal point of the style – the bag ‘opening’; it can be a flap, a frame, a zipper, or a draw-cord detail. The ‘body’ will have 5 planes: front, back, bottom, and 2 ends. The beauty of designing your own is that you can change at will the dimensions of the body cavity, shorten or lengthen straps, add pockets to create your own bag style from scratch. And if you’re like me, it’s easy to take creative risks if you can visualize the finished prototype in your mind’s eye.
Of course creating or adapting a pattern does require a lot of confidence in your spatial skills. In other words, you’ve got to be able to translate a 3-dimensional finished product to a 2-dimensional pattern; or the cutting pieces themselves, if you’re feeling bold and skipping the pattern all together.
What are spatial skills? Basically, they’re what we all use to mentally view objects from all angles…top, front, and side views, from top to bottom. If you’re good at reading a map or solving puzzles, you probably have strong spatial skills. If you “see” the pieces of a bag style, you’ve got it going on the ball.
But if you can’t seem to find your way around your cutting room or if pattern pieces never seem to mentally translate to the finished product, never fear! You can boost those skills with a little practice. Being able to mentally transform 3-D figures to their 2-D equivalents– and vice versa– can be tricky, but there is no special talent required.
If you only recently graduated from school or have recently moved to new abodes, you probably know something about “nets.” Nets are the 2-D representations of 3-D shapes. You know those cardboard boxes that you can buy flattened out and then assemble when you need them? These are examples of “nets”, with regard to visual or spatial perception: First it’s a “cube” net, then it’s a moving box!

Making patterns are much the same. Whenever you do clothing construction or sew up fashion accessories, you start out with flat pattern pieces (2-dimensional). In geometry, these shapes are nets, the foundation of spatial thinking. When we cut them out of the fabric, they’re flat and they may not look at all like what they’re meant to be. A collar may look like a semi-circle at first. Attach it to the neckline, and it curves over the shoulder and around your neck. And like magic, this pattern transforms into an actual collar (3-dimensional).
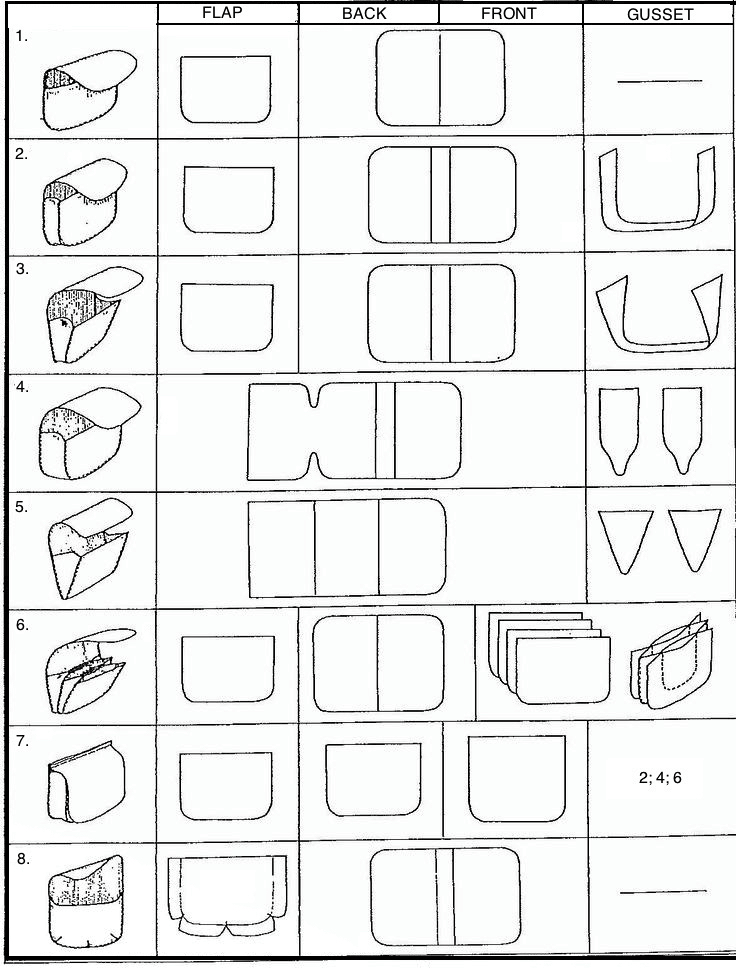
Zipper bags, tablet sleeves, wallets, and other little organizing carry-alls work the same way. Take a look at these pattern drafts for various bag styles. All began as a flat piece(s) of material.
But you don’t have to completely depend on your mental spatial skills to create or alter a pattern. If you’ve cut the pattern out of paper, just fold and curve it to see if it works. I often do this even if I think I know what I’m doing…. call it “sewing-in-paper”. Many times, the curved pieces of a pattern end up looking more like straight seams on the finished piece. That collar is a perfect example: the curve is actually the inner edge of the collar that sewn into the neckline, while the straight side is folded on itself around the neck, which appears round on the body.
And of course you can always verify your assumptions by making up a mock-up of your design. I do this when I’m trying a new pattern I’ve created or altered, or when the pattern is complex enough and my fabric is expensive enough or in limited supply. It’s a simple case of “measure twice, cut once”.
If your mock-up doesn’t turn out don’t lose faith in your abilities and above all, value these mistakes. Believe it or not, mistakes can be beneficial. They cause us to search for a different and often better way. They facilitate experimentation with new materials, techniques, or styles. Mistakes or challenges (as I like to call them) are an important part of the design process because they provide unique opportunities for creativity. Always make a toile or muslin fitting to test your pattern before cutting into your fashion fabric. Don’t be disappointed if it does not ‘turn out ‘ on the first attempt as planned; that is what creating mock-ups are for. These mock-ups allow you to modify the end result, correct the pattern, and work out the sewing/assembly process.
Now you may ask “ How do I develop my spatial abilities?” Sketch every day and sketch everything. Keep a record of your ideas in a sketch book. Redesign – redraw – renew your ideas.
- Draw everyday objects, close-up, and far away.
- Draw cross sections of objects that have been cut in half, such as fruit or vegetables
- Draw objects from feeling them through a sock or in a bag.
- Identify paths through mazes. routes on maps, paths created in trademark/logos to create visual objects.
- Look for differences in drawings with discrepant details.
- Find Waldo, Where’s Waldo and other similar puzzle books.
- Observe optical illusions.
- Drawings from observing objects through a microscope, hand lens, telescope, or binoculars. Make drawings from another person’s descriptions.
- Compare real objects with photographs or drawings of the objects.
- Create scrapbooks of objects as they change over time.
- Drawing a plant from day to day or season to season.
- Drawing interactions of other objects.
- Activities that involve figure rotations, reflections, projections, and pattern recognition.
- Use of pattern blocks, attribute games, Geoblocks, Unifix cubes, Cuisenaire rods and cubes.
- Brainstorm with drawings and story board collages.
So, if you’re resisting the urge to create your own patterns or alter one that you love, turn on your math brain, do some sketches and let your spatial skills work for you.


It has taken me years to get my head around spatial skills and I still have to work hard at it for some designs as I look at bags that I admire, however breaking it down does make it work. A very interesting read, thank you.
Hola Don
Me gusto su texto ¨Verlo desde todos los ángulos¨. No sabia que había que a los patrones había que pensarlos así, hasta resultan más sencillos. Saludos
Thank you Mari… I suppose that is why they still hire me. 😀
Gracias Mari…supongo que es por eso que me contratan. 😀
Great explanation and suggestions , thank you!
Nancy
Wonderfully explained. I have been hobbying around a bit with leather and seem the spatial element rather naturally. But reading your piece has articulated it all for me so well.
Thank you very much. I COMPLETELY appreciate the amount of effort you must have put in this piece.
Thank you, Sadanand.
Pingback: Pattern Drafting | Milos Crafts Design Studio
Reblogged this on Aydina Crafts and commented:
I just had to reblog this so I do not lose such useful information…