‘Lined Zippered Clutch Bag’
A simple clutch bag is probably everyone’s favourite handbag. And for good reason … it is so classic in style and never looks dated. Mostly though, we love how this minimalist look can be made quick and easily, using the simple lined zippered bag technique, in different sizes and for different occasions, from coin purse to cosmetic bag or hand clutch to full-sized portfolio.
Dimensions: approximately 12” wide x 11” high x 1” deep
[30cm W x 28cm H x 2.5cm D]
Construction Method: Turned finish – this method may be recognized by noting the lack of machine-stitching that is visible at points of assembly on the exterior side of the bag. This is possible by placing the material, or parts, face to face, machining and turning right-side out. It is the most commonly used assembly process.
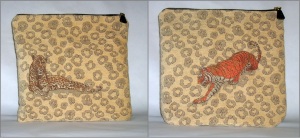
Material Used: 100% cotton tapestry; and 100% cotton pocketing fabric
You will need:
- 1 upholstery square*, 25” X 25” (64cm X 64cm)
- 1/3 yd. (30 cm) of pocket lining fabric, 54” wide (138 cm)
- 1/3 yd. (30 cm) of fusible interfacing, 44” wide (112cm)
- 1 closed luggage zipper (length equal to desired width of bag)
- coordinating thread
- kraft paper
PATTERN
The draft and formation of this clutch bag is based upon a simple flat grid, which fits into a square or rectangle, of which the size depends on the desired length of the zipper opening. There are no seam allowances added to the side seams of the pattern pieces. The length of the pattern (bag height) is whatever you desire as a finished length plus seam allowance. The zipper length used in the prototype sample is 12” [30 cm] long.
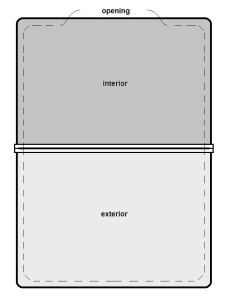
 The formation of the bag’s interior lining is the same as the exterior with a divider insert. The divider piece should be cut out as wide as the exterior of the bag and twice the height of the bag less 1-inch (25 mm), allowing it to be folded on itself to form a divided compartment for the interior.
Seam allowance (1/2” – 12 mm) is included in all drafts.
CUTTING
Bag Exterior – cut 2X upholstery fabric
Bag Interior – cut 2X lining fabric
Lining divider – cut 1X lining fabric
ASSEMBLY
1. Iron fusible interfacing to back of upholstery fabric, following manufacturer’s directions. (Design Note: if your fashion fabric has a textured or raised surface, baste a non-fusible interface to the fabric as heat and pressure of application will destroy the beauty of the fabric’s surface.)
2. Fold the lining divider fabric in half, with wrong sides of fabric facing together. Pin/baste divider to one of the lining pieces, with the folded edge about 1-inch [25 mm] from the top edge of the lining piece. Trim any excess fabric away from the lining’s outer edges, if necessary. Set aside.
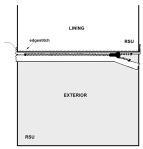
3. Attach zipper. Layer the lining on top of the exterior with FACE SIDES together, and sandwich the zipper (FACE SIDE DOWN facing the exterior) between the 2 layers.
Line up the three layers and pin/baste together. Using a zipper foot, sew across the top along the edge of your zipper sandwich and the zipper teeth.
Repeat this step for the other side (edge) of the zipper. You can edgestitch the lining sections along the zipper tape now, if you wish (optional).
4. Layer both pieces of lining to one side and both pieces of the exterior fabric to the other side of the zipper, with FACE SIDES together (note: remember to open the zipper at least halfway so that the bag can be turned right-side-out once the seams are stitched). The zipper teeth should be pinned toward the lining side. Lay the zipper ends on top of each other with teeth facing the lining side and pin.
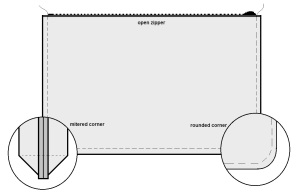
 5. Sew all the way around the perimeter edge. Ensure you sew on the outside of the metal parts on each end of the zipper, this will be easy to do if you cut your fabric the total length of the zipper tape. Leave an opening at the bottom of the lining side. Round the bottom corners OR miter the corners, as desired. Press seams open.
Click on illustrations to magnify.
6. Turn bag right-side-out. Stitch opening on lining closed by machine or slipstitch by hand.
7. Drop the lining portion inside the cavity of the bag to complete.
* Upholstery squares are often found for sale in remnant bins at your fabric retailer. They are usually cut from the last few yards remaining on the end of a bolt of upholstery fabric for quick sale as pillow and cushion covers.


Don this is wonderful. Thanks for sharing.
Tahnk you! . I will try to do this project 😀
This is the best purse website by far and this is even an understatement. Thank you.
thanks Hayes…it is actually a pattern drafting site with overtones of handbag design.
I love your site, but can you tell me where I can economically order zippers and hardware to make my purses look more professional?
Thanks!
I have found zippers at Wawak Sewing. You can google their site and they will send you a catalog. Let me know if you have any ideas about purse hardware, that seems difficult to find for me.
I am not a big fan of YKK which is what is being sold at Wawak Sewing. The marketplace is flooded with this brand yet most are made off-shore and an inferior product. If you are going to go with YKK, check the origins of manufacture. YKK Canada and YKK USA are a much better choice for a quality zipper. Now in all fairness, this is solely my opinion with my experience with this zipper brand so you may not agree.
Finally! Someone who can correctly communicate sewing directions! I have been sewing for thirty years now and I have never found a store bought purse pattern with understandable directions. Pinterest is the same. Most of these pinners/blog writers have no real sewing experience and if they do, they cannot properly communicate it! Its great to read work from someone who clearly knows what they are doing and can communicate effectively. This site is incredible and I appreciate the effort and work that you share here!
Thank you Cyndi….my goal is to show that it is not rocket science. Anyone can be their own fashion designer.
Pingback: Making bags – it’s all in the hardware | toile & trouble
Pingback: Celebrate National Sewing Month | Bag'n-telle